Home - Return to Previous Page


2001-2007 LB7 / LLY / LBZ Duramax OEM Placement Coolant Tank Kit
WCF100645
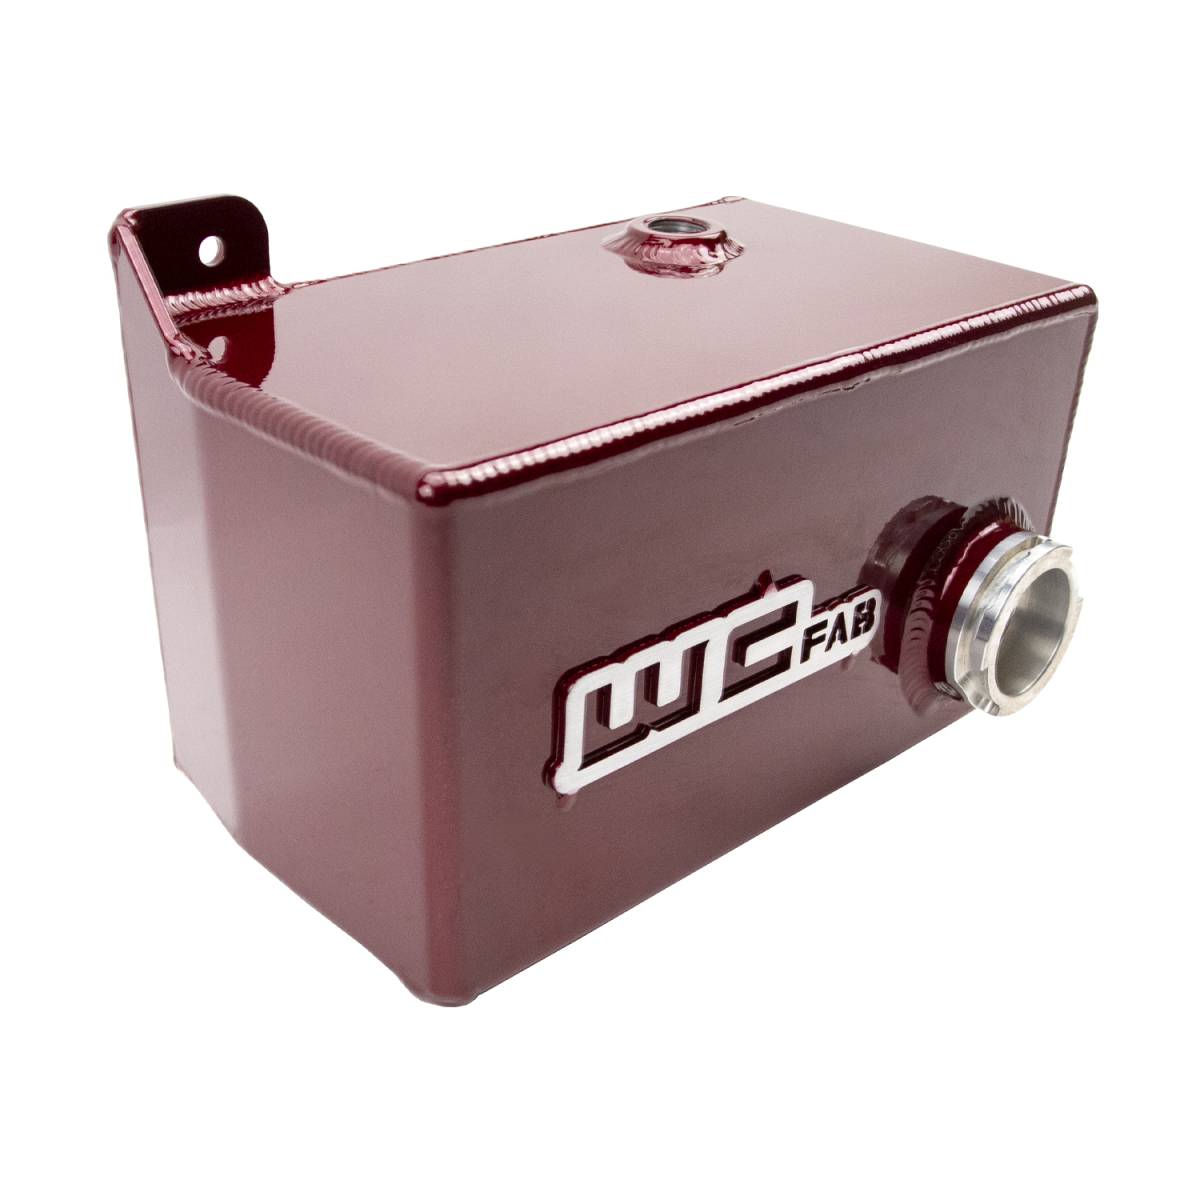
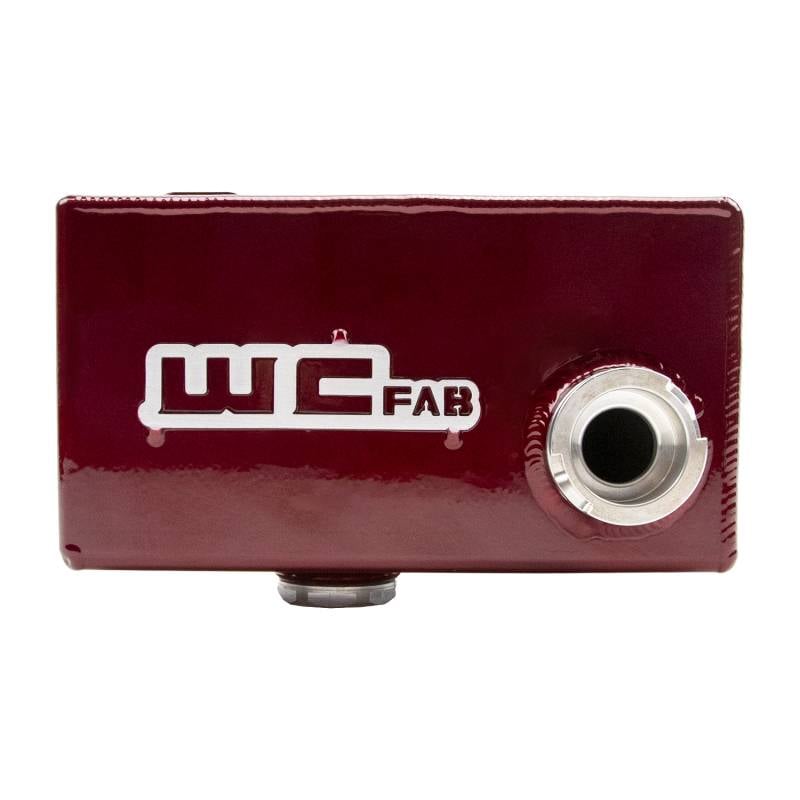
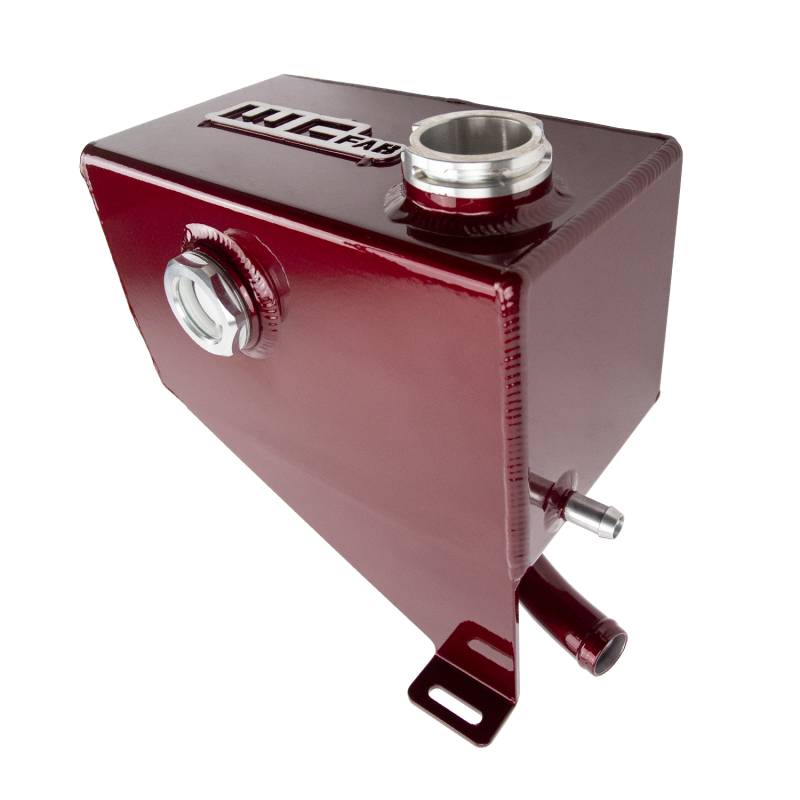
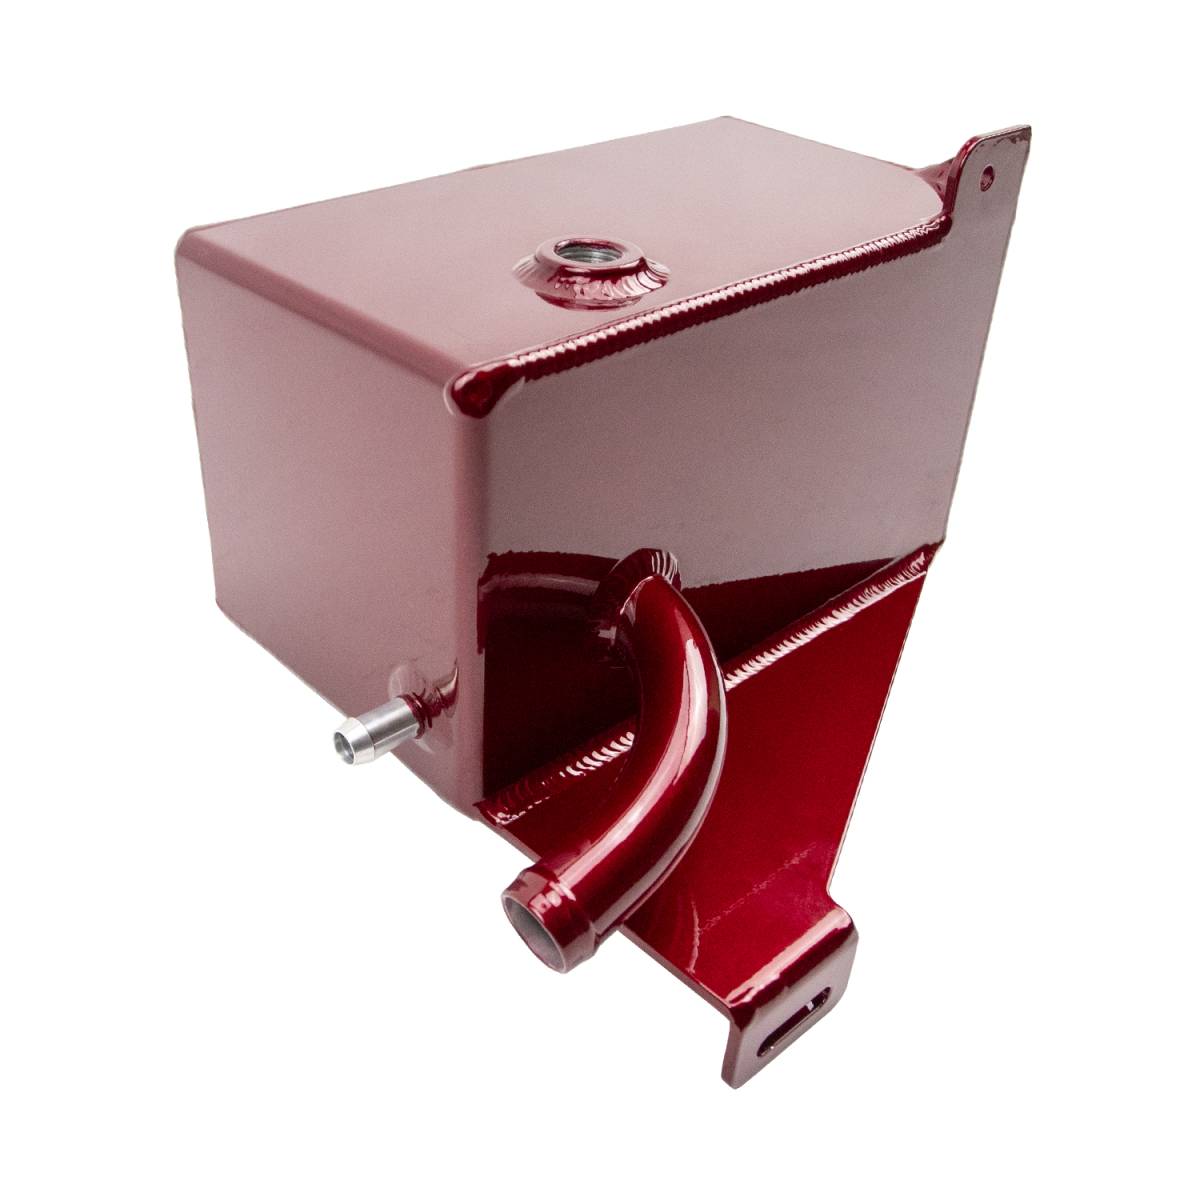
-Coolant Tank
-Serviceable Low Coolant Level Sensor
-Billet Anodized Cap
-Over Flow Hose
-Coolant Level Sight Glass
-Installation Hardware
-Durable Custom Powder Coat Finish
-Serviceable Low Coolant Level Sensor
-Billet Anodized Cap
-Over Flow Hose
-Coolant Level Sight Glass
-Installation Hardware
-Durable Custom Powder Coat Finish
Availability: WCFab Red, Candy Teal, Gloss White, and Gloss Black in stock and ships in 3-5 business days. 10-15 business day lead time on other colors.
Pricing:
$489.00
Description
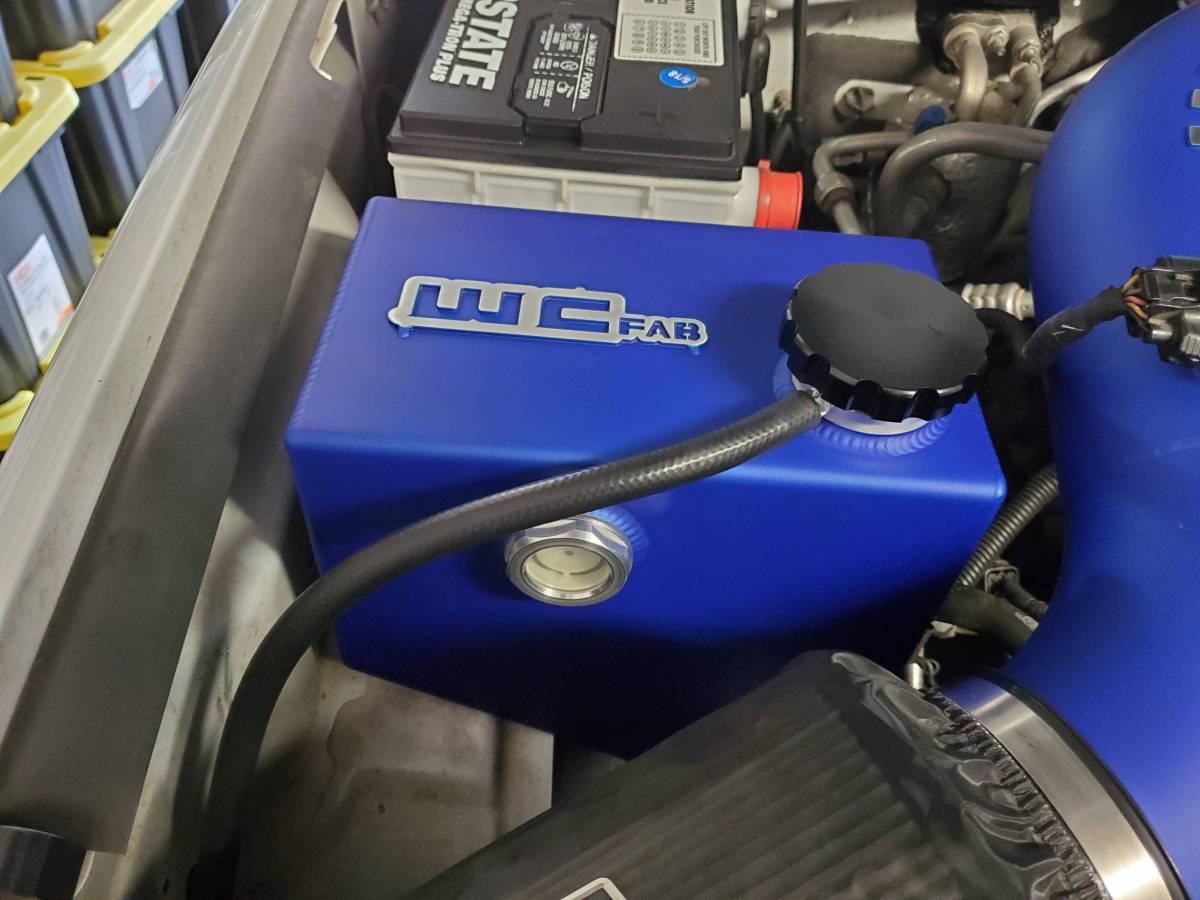
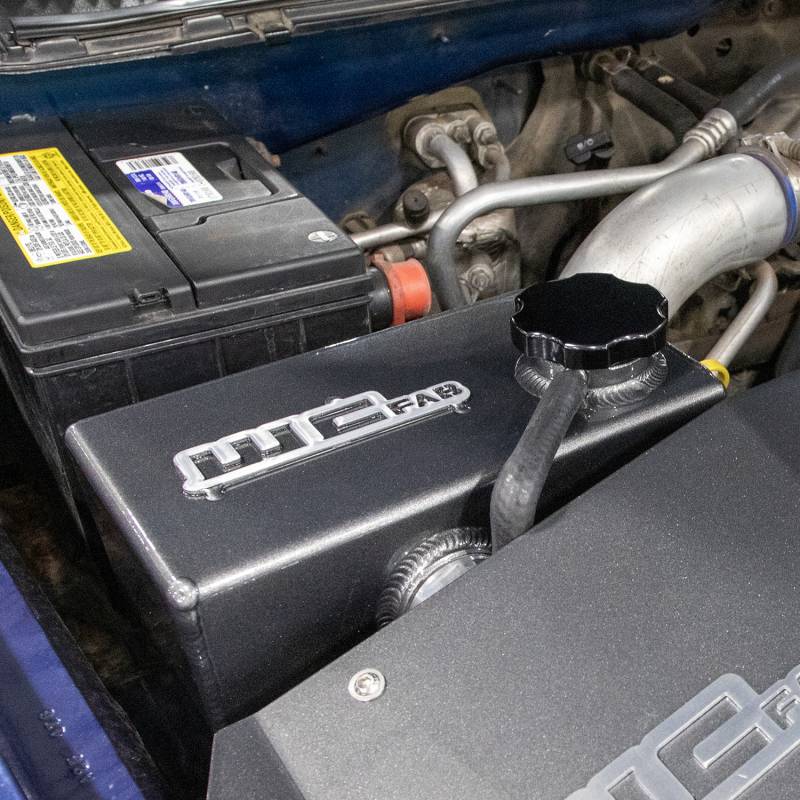
This Fabricated Aluminum Coolant Tank Kit for the 2001-2007 Chevrolet Silverado and GMC Sierra 2500 / 3500 HD trucks equipped with the 6.6L Duramax diesel engine mounts in the OEM coolant tank location.
- Dress up your engine bay by replacing the ugly clear plastic coolant reservoir with our custom powder coated fabricated aluminum coolant tank with sight glass
- Includes black anodized CNC machined billet aluminum cap, mounting hardware, overflow hose and low coolant sensor
- Will fit on stock trucks with no other modifications necessary
- Uses OEM mounting points
- Installs easily with basic hand tools
Replaces the following GM Part Numbers: 15808714, 15290795, 19353729
Video
Extra Details
Jason Wehrli:
Today, we are going to show you our Duramax fabricated aluminum coolant tank kits.
All right, the fabricated aluminum coolant tank for the Duramax platform. The Duramax has been a long-running platform from 2001 to the current model year 2024, and there have been many different RPO codes over those years and many improvements to keep up with the horsepower ratings on these engines. So we offer a coolant tank for every model year RPO code, starting with the '01 to '07, your classic body style trucks, a little bit larger tank on the passenger side, right behind that air box. Then, the LMM is not pictured here on the table. It is very similar looking to the LML tank, which is this candy blue one in front of us, 11 to 16 again sitting right behind that passenger air intake box. And then from there, we move into our first-gen L5P, which is your 17 to 19 L5P platform, and they move the coolant tank back to the firewall on the passenger side this model year.
Then, in the 2020 model year, with the body change, GM moved the coolant tank from the passenger side to the driver's side on the firewall. It's a much larger style tank over there. But all of these tanks, again, as I mentioned, are meant as an OEM drop-in replacement. So these tanks we designed in CAD on the computer, we're able to design them with a very precise fit using OEM style mounting locations, connecting to OEM style hoses, and fitting right in that factory location just as the OEM tank did for the least amount, and in most cases, no modifications of anything in the surrounding area. Our tanks are manufactured here in-house, starting as a flat aluminum sheet on our laser. We laser cut the flat sheets, and then they move to our CNC press break, where they get bent. From there, they move into the fabrication shop where they get TIG welded together, adding all of the necessary bungs and fittings, welding up all of the seams, and adding that WCFab logo on the top.
Another standard component on all of our OEM placement coolant tanks is our high-quality billet aluminum sight glass. We pre-install these sight glasses after powder coat before they get wrapped up to ship out. It's a very fine thread, very, very easy to cross-thread. So we apply the proper lubrication and torque that sight glass to the proper torque so that you don't have to worry about messing with that when you receive your cooling tank. The sight glass offers a quick and easy view of your coolant level when you pop the hood on top of all the coolant tanks. The filler neck CNC machined here in-house accepts our high-quality billet aluminum black anodized coolant tank cap; all tanks come standard with the black anodized cap. We do offer available as a separate purchase, a clear anodized version if you would rather have that clear look.
Then, for our coolant overflow port, we have our little hose barb for that, as well as our preformed rubber hose. Finishing off that installation for a nice OEM-style look. One other item here is our coolant level sensor. In all of the OEM tanks on the Duramax trucks, the factory coolant level sensor is incorporated and molded into the tank and is a non-serviceable item. The 2017 to current L5P are notorious for coolant level sensor issues requiring complete replacement of that OEM tank when those factory sensors become faulty. So we supply a thread-in style, serviceable, low-cooling sensor. The last item we'll touch on here is the tank in the center, which has our optional powder coat WCfab tag. All tanks come standard with a raw style tag. If you use a two-coat color, that tag will have a clear coat. With a single-coat standard color like this flat black one, there will be a raw aluminum brushed finish tank in front of us in the center through the candy red, much smaller in size; that is our twin turbo style tank for 2001 to 2019 models.
And these are not drop-in-style replacement tanks. The twin-turbo-style tank is manufactured for DIY builders looking to build a custom turbo setup, compound turbo applications, or racing applications. These style tanks are much smaller and more compact in size and sit closer to the passenger side fender, allowing more room for larger and additional turbochargers. In most cases, they require relocation or removal of your passenger-side battery and rerouting of other OEM-style components. So, if you want to replace your OEM tank in the OEM location, ensure you're getting the OEM-style tank and not the twin-turbo-style tank.
So why would you be upgrading the coolant tank on your Duramax? Many of these models of Duramax have some notorious coolant level sensor issues that require the replacement of the OEM tank. So if you've got to replace that OEM tank, you might as well spice up the underhood a little bit, give yourself a nicer-looking, more reliable aluminum-fabricated tank, and serviceable sensor, and add a little color underneath the hood.
That's the second reason you might upgrade. If you've got all of our other upgraded underhood components, the Intercooler Plumbing, upgraded powder-coated turbocharger intake systems, and all those good-looking parts, those OEM coolant tanks are a pretty unsightly look right behind a nice fabricated aluminum airbox, especially on the older model of year trucks. The tanks become yellow over time, and if you've had a truck that's had head gasket issues, they'll even become very black and dirty inside, and there's no good way to clean them out. So upgrading that cooling tank is a nice final touch to your engine bay as another fabricated custom powder-coated component.
Tech Support Video
Transcript
Good day. I'm Ryan Killey, a sales and tech support technician at WCFab. Today, I'll address common questions we receive about coolant tanks, particularly focusing on the correct installation of the cap and coolant sensors.
PROPER INSTALLATION OF COOLANT TANK CAP
The cap itself is a two-pronged style, similar to older version coolant tanks and older version radiators. So there are two prongs on each side that you'll line up with two grooves that we have on the tank itself. So you drop that down into place, give it a good push down, and twist it. Now you'll feel it get loose and wiggle. That's in the first detent. It's not where it's supposed to be, so you give it another good push and twist it, and you'll feel it turn and lock right where it's supposed to be. As you notice, it doesn't wiggle or move anything in place, and no coolant will come out of that. Now, I'll move on to the sensors themselves. So we have two sensors here to show you.
FIRST GENERATION SENSOR
The first sensor is our GEN ONE sensor. This is a discontinued sensor. We no longer use this, but there are still maybe some in circulation, so we wanted to point it out to you anyway. This sensor is just a simple float design. On the side here, you'll notice there's an arrow. This one's got a little bit of debris on it, so you can see the arrow a little bit easier, but you want to make sure the arrow is POINTING UP. The arrow pointing up tells you that the float is properly positioned. So when the cooling tank is full, it'll sit like this: As cooling levels go down, it'll disconnect. It'll throw a low cooling light.
NEW SENSOR DESIGN
The second sensor is our new Gen 2 sensor, which works similarly. The one thing I want to point out is the arrow that's on the backside here with the wires. The arrow has to POINT DOWN. If the arrow's not pointing down, it'll throw a low coolant light immediately. Similar process here. It works because it sits like so, or the coolant tank is full, and then the coolant level drops, and then it throws a little coolant light. Very similar process and sensor. Just a little bit different design that we've moved on to.
INSPECTING THE SENSOR BUNG ON THE COOLANT TANK
Now, I will show you guys the proper way to install this sensor. It will go on the backside of the tank here on this bung. So, the first thing I want you to do is to inspect the hole itself and make sure there's no dirt, debris, any metal shavings, or anything that's in this bung that could be. We do tap them and we do inspect them before we send them out. But it is one thing that I always want you to check before you put the sensor in, and you will want to use a high-temperature thread sealant.
HIGH-TEMPERATURE THREAD SEALANT
We use PERMATEX. It works very well. I will take this and do a pretty good layer over the sensor. I'm going to get a little messy here and use my finger a little bit on it. You want to make sure the majority of the threads have a pretty good layer of thread sealant over them.
You don't want to go overboard, but you want to ensure they're full. That way, it has time to sit, cure, and seal up in the threads on the tank.
INSTALLING THE SENSOR
Next, you're going to go ahead and drop in the sensor. With your hand to start, you want to get it as tight as possible, so be cautious with the wires. You don't want to get these all twisted up and ruin the connection. You'll get down pretty far. The sensor will be almost in. That's as far as I can get by hand. As you can tell, the arrow on the sensor is pointing up at an angle, and we need it to point down.
So, I'm going to set this backdown. If you have the new black sensor, you’ll take a 13-millimeter wrench and give it a good spin. I will go around again here, and then you’ll have it like so, where the arrow is pointing down. We can typically wipe off some of this extra Permatex here to make it look slightly cleaner. And then, you will want to let this sit for at least 24 hours. The cure rate on this does take a little while. If you fill it up with coolant sooner, it will cause a leak. So I recommend 24 hours at a minimum for it to properly here so that you don't have any leaks on your coolant sensor.
CONCLUSION
That is all we have today with the coolant cap and cool it sensor install. If you have any more tech questions or tech support that you would like to see, feel free to comment below and let us know. Thank you. Have a good day.
Details
- WCF100645
- WCF100645
- Wehrli Custom Fabrication
- WCFab Red, Candy Teal, Gloss White, and Gloss Black in stock and ships in 3-5 business days. 10-15 business day lead time on other colors.
- New
Categories
- Duramax - 2006-2007 LBZ Duramax - Cooling System
- Duramax - 2006-2007 LBZ Duramax - Engine Dress Up
- Duramax - 2004.5-2005 LLY Duramax - Cooling System
- Duramax - 2004.5-2005 LLY Duramax - Engine Dress Up
- Duramax - 2001-2004 LB7 Duramax - Cooling System
- Duramax - 2001-2004 LB7 Duramax - Engine Dress Up
- Featured Categories - Coolant Tank Kits and Coolant Pipes - Duramax
- Engine Dress Up
Shipping Information
- Item Requires Shipping
- 8.0 lbs.
- W16.0000” x H16.0000” x L10.0000”
- This item ships in its own box.


